Veelgestelde vragen
Snel naar
Algemeen
Wat gebeurt er als mijn Poppyz licentie is verlopen en hoe kan ik deze verlengen?
Als je Poppyz licentie is verlopen blijft alles werken voor je bestaande klanten. Zij merken hier niets van. Als zij een lidmaatschap hebben of resterende betalingen van betalen in termijnen/tranches dan worden deze na het verlopen van de licentie gewoon nog geïncasseerd en gefactureerd.
Je kan echter geen nieuwe verkopen meer doen van programmarondes en E-producten. En ook geen cursussen meer aanmaken en bewerken.
Als je in je dashboard naar Cursussen -> Instellingen -> Poppyz gaat, dan kan je zien tot welke datum je licentie geldig is. Je krijgt een maand en dag voor het verstrijken van je Poppyz licentie een notificatie mail.
Ook in je dashboard verschijnt een notificatie met een link om te verlengen.
Hier vindt je info over het verlengen en de links om je licentie te verlengen: https://www.simonelevie.nl/membership/
Je kan MPOP + Poppyz licentie + support verlengen of alleen Poppyz + support.
Mocht de einddatum van je licentie volgens jou niet kloppen, neem dan contact op met Matthijs (matthijs@simonelevie.nl).
Hoe maak ik een beheerder aan, zodat iemand van support een probleem kan oplossen?
Waarom krijg ik de melding “Licentie is verlopen” of “Licentie is ongeldig”?
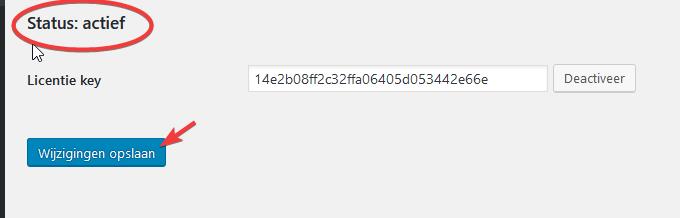
Dit betekent dat de licentie is verlopen, ongeldig is of dat de licentie key nog niet is ingevoerd in de instellingen. Om de status van je licentie te controleren ga je naar Instellingen -> Cursussen -> Instellingen. Check of de status op actief staat, als dat niet zo vul dan de juiste licentie key in en druk dan op de knop activeer en vervolgens op Wijzigingen opslaan.
Waardoor krijg ik verkeerde programma URL’s en 404-pagina’s?
Poppyz maakt gebruik van Pretty Permalinks om de leesbaarheid van de links van cursussen, lessen en programmarondes te verbeteren. Als deze functie niet is ingeschakeld, kunnen er onverwachte problemen optreden als gevolg van verkeerde koppelingen in de plug-in.
Pretty Permalinks schakel je als volgt in: ga naar WordPress Instellingen -> Permalinks. Kies Berichtnaam en klik op Wijzigingen opslaan.

Sommige servers ondersteunen dit niet standaard. Neem in dit geval contact op met je hostingpartij om dit in te schakelen. Je kunt ze deze link sturen met uitleg hoe dat dient te gebeuren.
Kan ik mijn academie ook in het Engels maken?
Ja dat kan. Poppyz is volledig tweetalig, zowel de backend als de frontent (wat je klanten zien).
Als je bij de WordPres instellingen (Instellingen -> Algemeen) Engels als taal kiest, dan neemt Poppyz dat over. Je kan de taal dus niet in Poppyz zelf instellen.
Mocht je zowel Nederlandstalige klanten als buitenlands klanten willen bedienen (Engels) dan raad ik je aan om twee sites te maken. Mits voor eigen gebruik dan kan je een extra Poppyz licentie krijgen zonder meerkosten.
Hoe kan ik de footer aanpassen?
Standaard ziet de Divi footer er zo uit:

Je kan deze als volgt aanpassen:
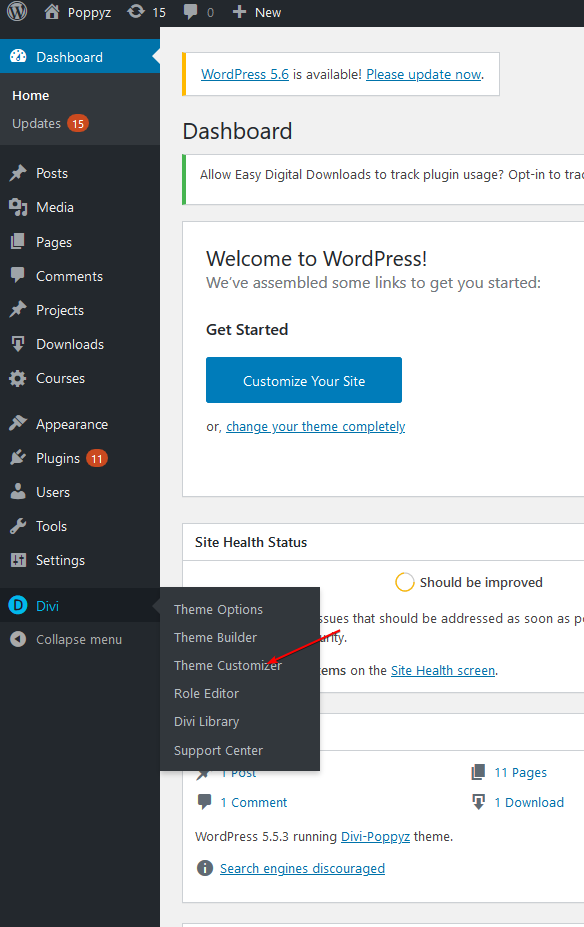
- Ga naar Divi -> Theme Customizer
- Kies hier Footer.
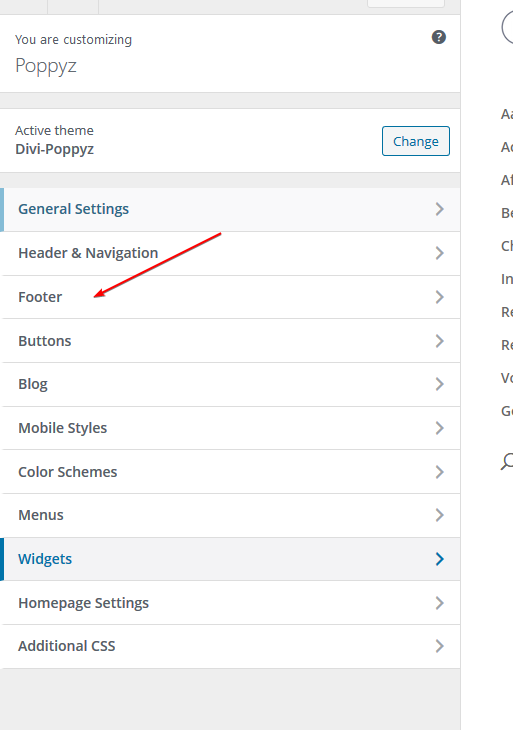
- Hier kan je de layout van de footer aanpassen.
- Social media links kan je verwijderen via Footer elements sectie.
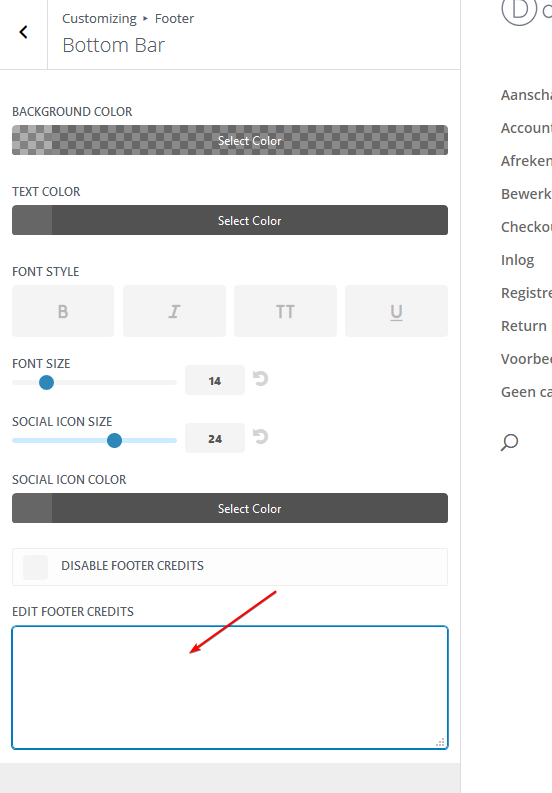
- De standaard tekst pas je aan via Bottom Bar menu vul hier je eigen tekst in bij Edit Footer Credits sectie, of schakel deze uit.
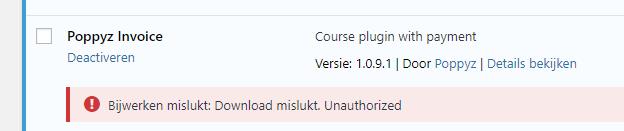
Wat moet ik doen als de Poppyz update mislukt?
Soms kan Poppyz niet automatisch worden bijgewerkt via het WP-dashboard.
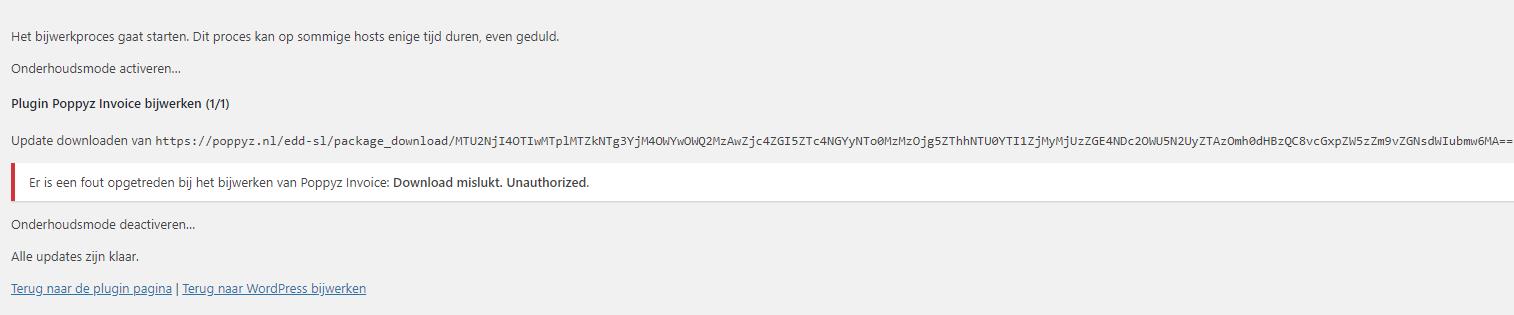
Het eerste wat je moet checken is of Poppyz licentie is geactiveerd. Ga naar Instellingen -> Cursussen -> Instellingen, zorg ervoor dat onder het tabblad Activeren de status van de licentie “Geactiveerd” is. Zo niet, klik dan op de activeringsknop. Als dit niet werkt, betekent dit dat de licentie key is verlopen of ongeldig. Vraag een nieuwe licentie aan door contact op te nemen met de poppys@socialmedium.nl.
Soms kan het komen door een (verkeerde) serverinstelling. Als dit gebeurt dan dien je de nieuwste versie van Poppyz te downloaden door contact op te nemen met poppyz@socialmedium.nl. Deactiveer en verwijder de huidige Poppyz-plug-in die op je website is geïnstalleerd en upload en activeer de nieuwe. Door de plug-in te verwijderen, worden geen gegevens verwijderd, zoals cursussen, lessen, programmarondes, deelnemers, facturen, instellingen etc.
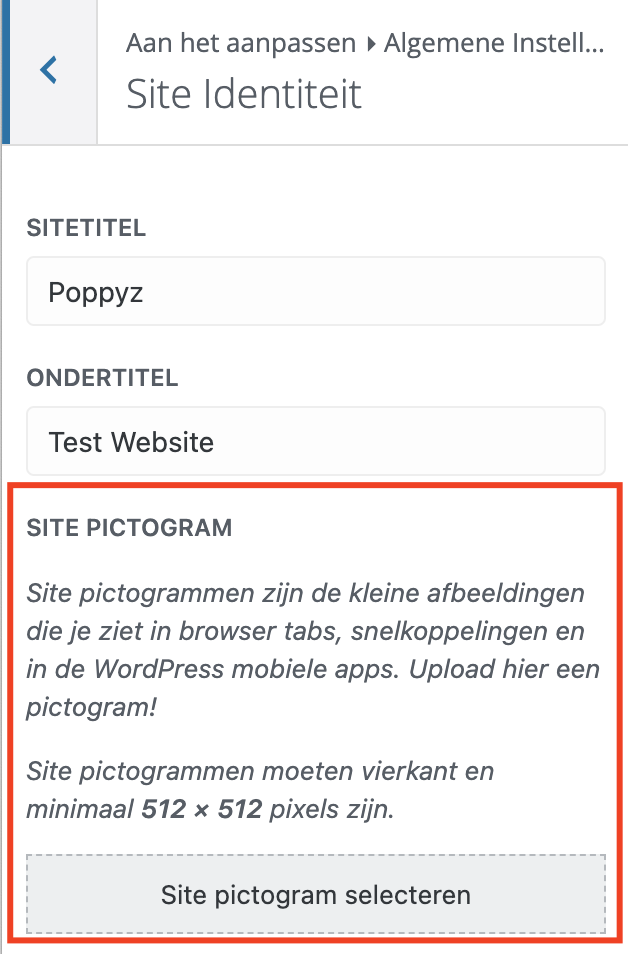
Hoe voeg ik een favicon (website pictogram) toe?
Een favicon wordt getoond als kleine afbeelding bij het tabblad van browsers.
Ga hiervoor in je dashboard naar: Weergave -> Customizer -> Algemene instellingen -> Site identiteit.
Waarom worden al mijn menu-items weergegeven of ontbreken ze?
Als je het Divi-Poppyz child-thema gebruikt, dan moet je eerst de menulocatie toewijzen aan Loggedin menu of Loggedout menu
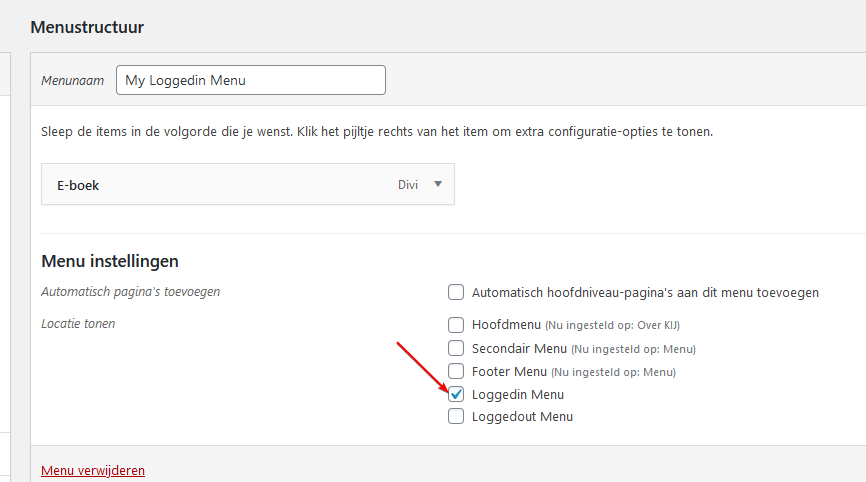
Nota bene: de menunaam doet er niet toe. Alleen de menulocatie zoals hierboven aangegeven. Dit betekent dus dat je twee menu’s moet hebben; een voor uitgelogde gebruikers en een voor ingelogde gebruikers.
Het menu voor ingelogde bezoekers bevat doorgaans sowieso de accountpagina, het profiel bewerken en eventueel pagina’s van cursussen.
Het menu voor niet ingelogde bezoekers kan bijvoorbeeld de loginpagina of een overzichtspagina bevatten.
Hoe kan ik een link in een nieuw tabblad laten openen?
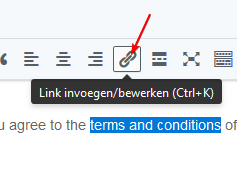
Zeker in het bestelproces is het belangrijk om de links in een ander tabblad te laten openen. Denk bijvoorbeeld aan de link naar je algemene voorwaarden.
- Selecteer en klik op het kettinkje.
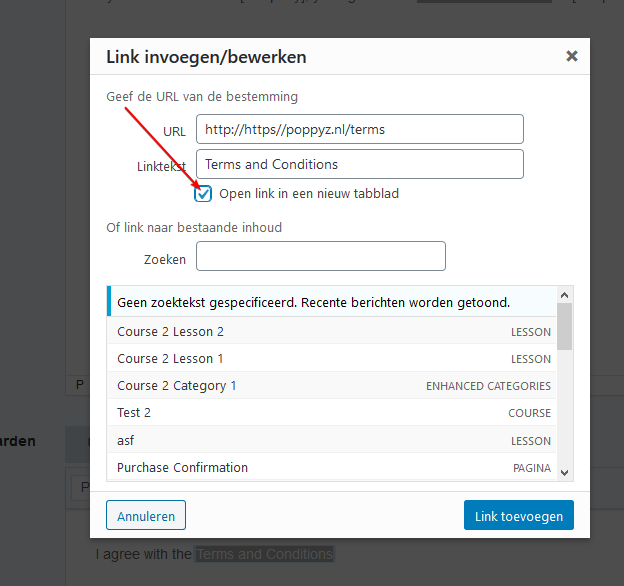
- Klik op het tandwiel.

- Vink “Open link in een nieuw tabblad” aan.
Divi
Hoe kan ik zorgen dat de lesiconen goed zijn uitgelijnd?
Als je titels hebt die soms meerdere regels beslaan, dan zijn de lesiconen niet meer uitgelijnd. Dit kan je oplossen door in de CSS-klasse dit toe te voegen: “et_blog_grid_equal_height”.
Ga hiervoor naar de instellingen van de Poppyz les- of cursusmodule en dan naar “Geavanceerd”.

Nota bene: dit werkt voor alle Poppyz modules waar cursus- en lesiconen worden getoond.
Waarom krijg ik de melding dat de Lesson-module niet volledig compatibel is met Divi?
De kans is groot dat je de onderstaande melding hebt gekregen.

Dit betekent dat de content van de module helaas niet toont als je de pagina aan het bewerken bent. Alles toont en werkt aan de voorkant echter wel. Je kan de content en wijzigingen het beste bekijken door een ander tabblad in je browser te openen en de pagina aan de voorkant te bekijken. We hebben Divi gevraagd om deze functionaliteit ook in courante codeertalen beschikbaar te stellen, nu is dat alleen mogelijk in die van hunzelf. Aangezien dit geen urgent probleem is, gaan we de module niet ontwikkelen in hun codeertaal omdat dat dubbel (onderhouds)werk is en kans op bugs dan ook toeneemt.
Waarom worden mijn Divi lay-outs en modules niet getoond in mijn bibliotheek?
Hoe kan ik omschakelen van Profit Builder naar Divi?
Aangezien dit een lange uitleg is, hebben we hier een pagina van gemaakt.
Ik zie dat er een update beschikbaar is voor het Divi-thema, maar ik weet niet hoe ik deze kan updaten.
Bekijk de uitleg van Divi om het Divi thema te updaten.
Cursussen & lessen
Hoe kan ik ‘vorige’ en ‘volgende’ les toevoegen of verwijderen bij een les?
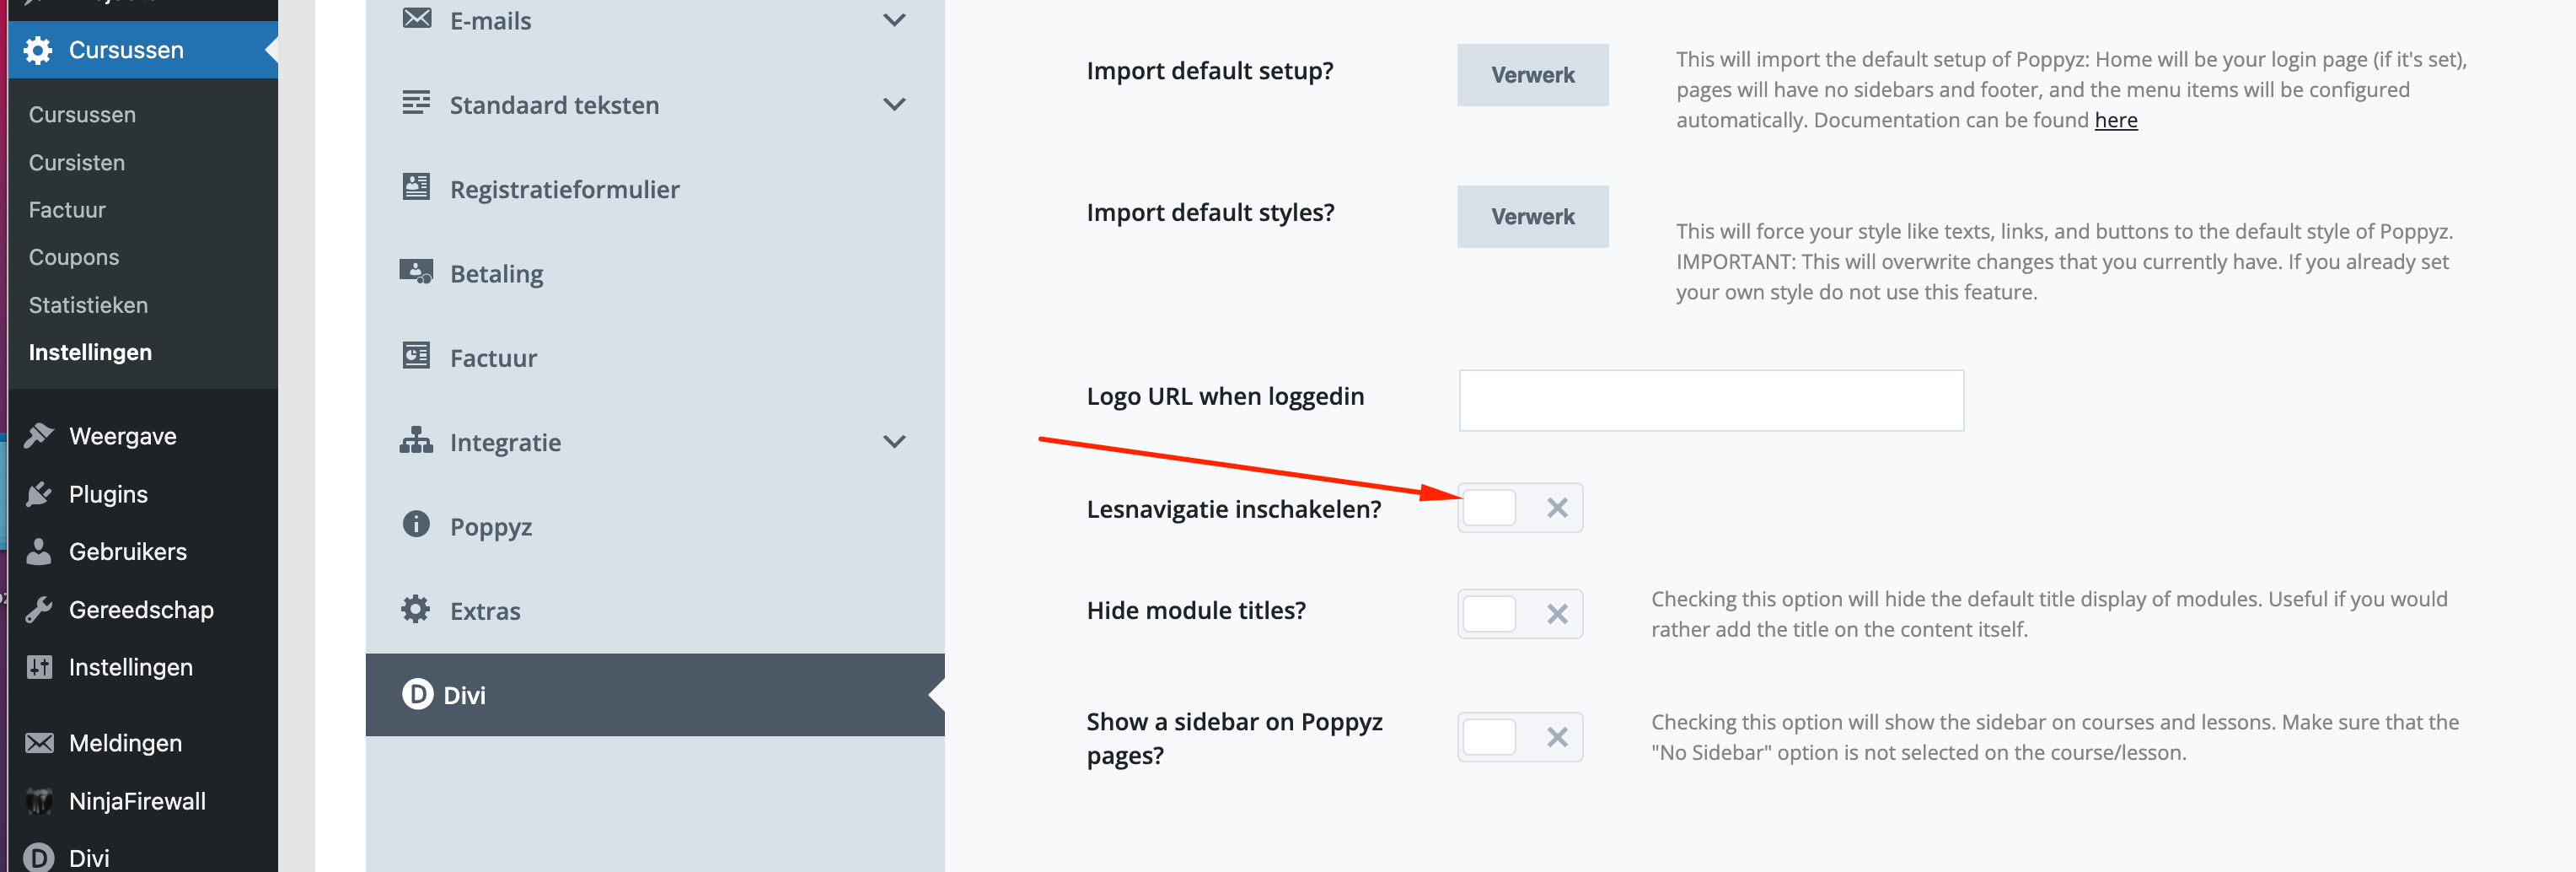
Je kan dit in de instellingen (de)activeren (Cursussen -> Instellingen -> Divi.
Waarom krijg ik steeds veel nieuwe gebruikers die er verdacht uitzien en hoe kan ik dat voorkomen?
Dit zijn veelal bots (dus geen echte personen). Deze gebruikers kunnen nergens bij, maar uiteraard is het wel hinderlijk. Onderstaand lees je wat je er tegen kan doen.
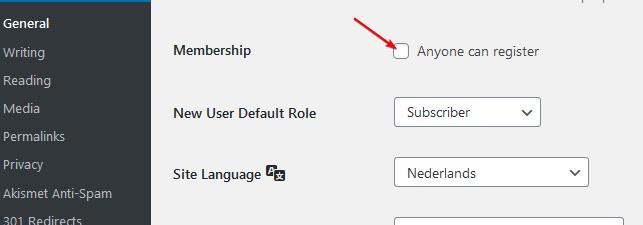
Schakel gebruiker registraties uit in WordPress
Poppyz heeft zijn eigen registratieformulier, het is daarom geen probleem om de standaard WordPress-registratiepagina uit te schakelen. Dit wordt namelijk vaak gebruikt voor spamregistraties. Ga hiervoor naar Instellingen -> Algemeen en zorg ervoor dat het veld “Iedereen kan registreren niet is aangevinkt“.
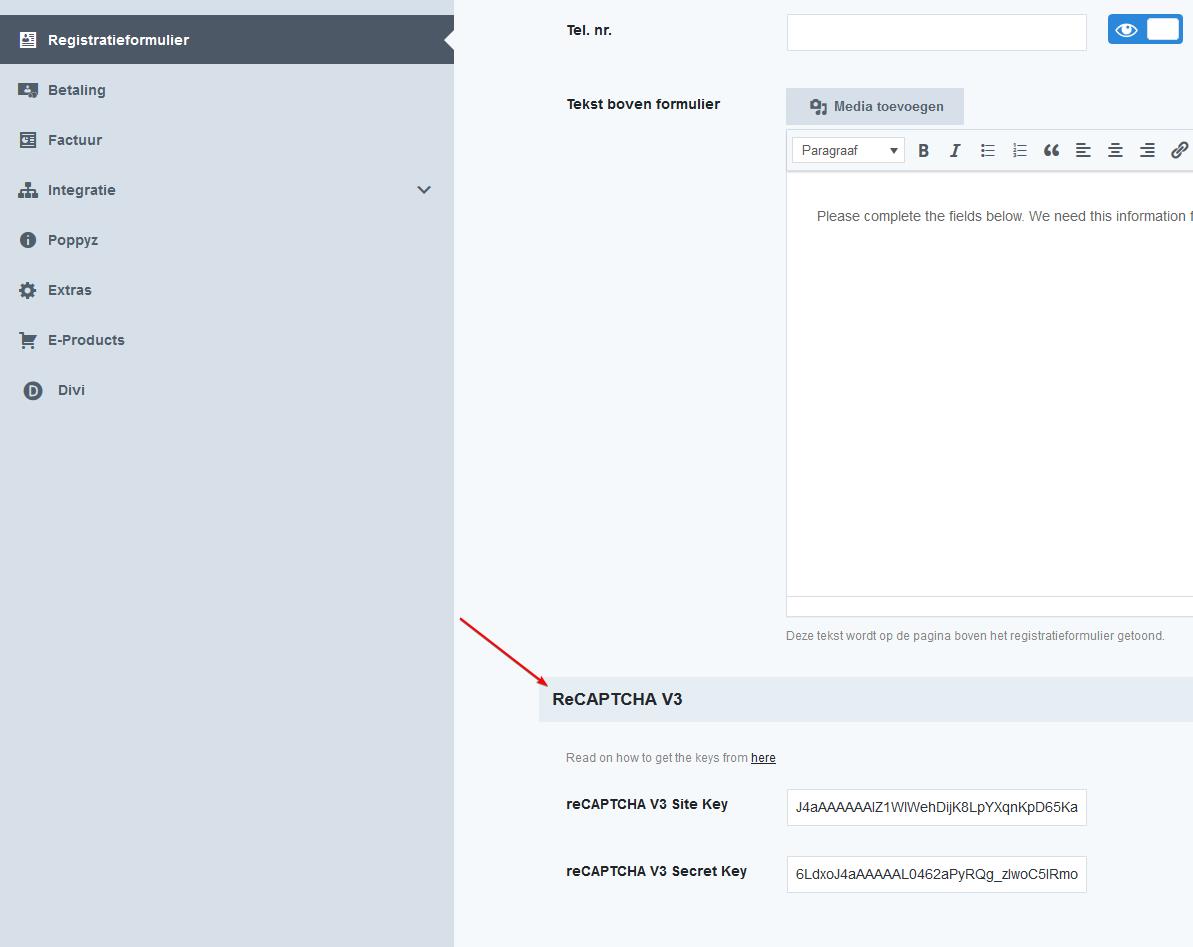
Schakel Poppyz’s ReCAPTCHA v3 Integratie in
Dit is de effectiefste manier om spamregistraties te voorkomen. Ga hiervoor in je WordPress dashboard naar: Cursussen -> Instellingen -> Registratieformulier. Vul onderaan de Site key en de Secret key in. Deze kan je verkrijgen door naar deze Google pagina te gaan. Zorg dat je V3 aanvinkt en vul je domein/URL van je academie in, zie onderstaand.
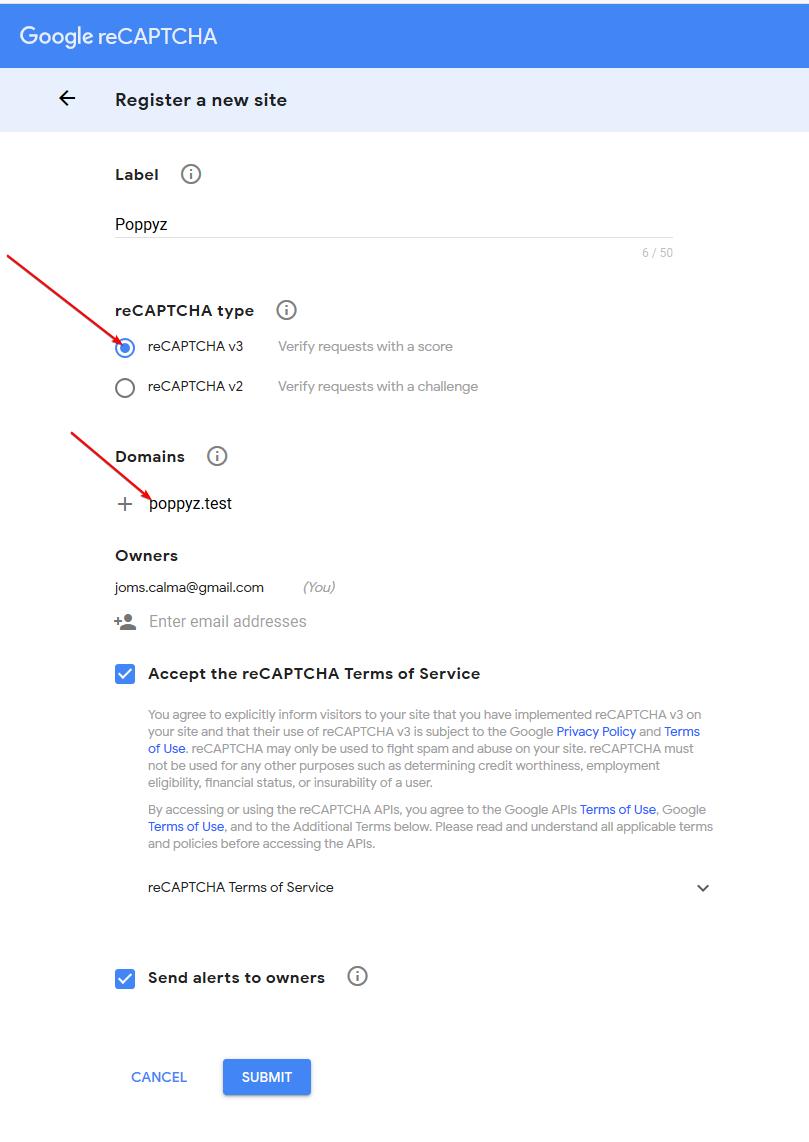
Klik op de submit knop en de gegevens verschijnen op je scherm. Kopieer-plak deze in de Poppyz instellingen bij ReCAPTCHA V3.
Waarom ontvangen ik en mijn gebruikers geen e-mails?
Belangrijke tip: we raden je ten zeerste aan om de mails te laten versturen d.m.v. SMTP. De mails worden dan namelijk via je eigen mailserver verstuurd. De kans dat de mails niet aankomen is daarmee veel kleiner dan als de mails via de website worden verstuurd. de plugin WP-Mail-SMTP te installeren. Hiermee kan je namelijk heel eenvoudig alles instellen en eventueel kiezen om de mails te versturen via je eigen mailserver (SMTP). Lees de uitleg hierover”.
Onderstaande uitleg is alleen relevant als je de e-mails niet via SMTP laat versturen.
Als je de e-mails wel via je website laat versturen, dan is het risico dat ze in de spambox van je klanten terechtkomen. Dit is een veelvoorkomend probleem op websites vanwaar e-mails worden verzonden naar hun gebruikers. Je kan er wel voor zorgen dat de kans zo laag mogelijk is.
- De Email van moet overeenkomen met het domein/URL van je website.
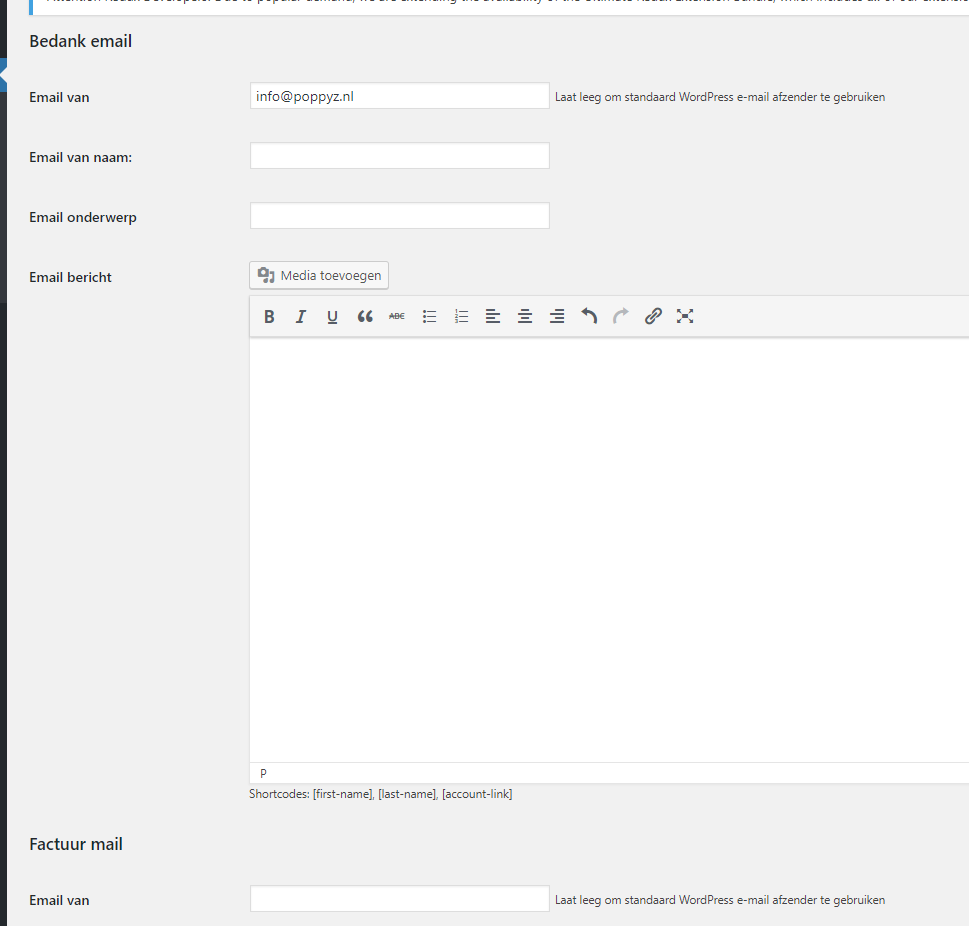
Als je testwebsite.nl gebruikt dan moet de email van er zo uitzien: <watjemaarwilt>@testwebsite.nl - Je kan het veld ook leeg laten zodat WordPress zijn eigen van e-mailadres kan genereren op basis van je domein.
Er kan ook een andere reden zijn voor het probleem: het e-mailsysteem is niet correct geconfigureerd op je server. Als dit het geval is, ligt de oorzaak buiten Poppyz en dien je contact op te nemen met je hostingpartij hoe dit opgelost kan worden. Om te bepalen of dit het geval is, kan je de plugin Check Email plugin installeren. Je kan dit ook testen door een gebruiker van de beheerder te maken. Als je dit doet dan zou er een mail moeten worden gestuurd. Daarnaast kan je met de plugin WP logging mail zien welke mails zijn verstuurd.
Hoe kan ik de afzender aanpassen van de e-mails die vanuit mijn site worden verstuurd?
Het is belangrijk om hier zorgvuldig mee om te gaan omdat e-mails die vanuit een website gestuurd worden vaak in de spam box terecht komen van de ontvanger.
Zorg ervoor dat het risico zo klein mogelijk is en lees de uitleg(met name het deel “Zorg dat je e-mails aankomen”).
Hoe schakel ik mogelijkheid tot geven van reacties uit bij cursussen en lessen?
Check eerst of je minimaal vesie 1.3. hebt van de Divi-Poppyz integratie plugin.
Bij deze versie is dat standaard uitgeschakeld.
Mocht je het bij een of meerdere cursussen willen inschakelen:
- Voeg een Reactie module toe waar je het wil tonen.
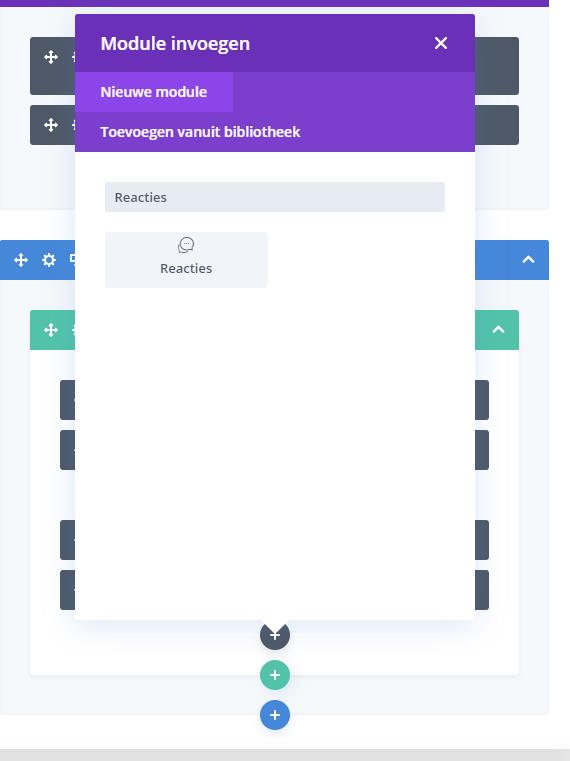
- Scroll naar beneden en check of het is aangevinkt:
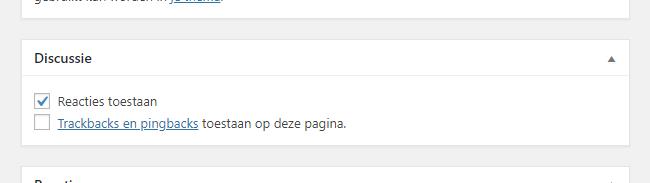
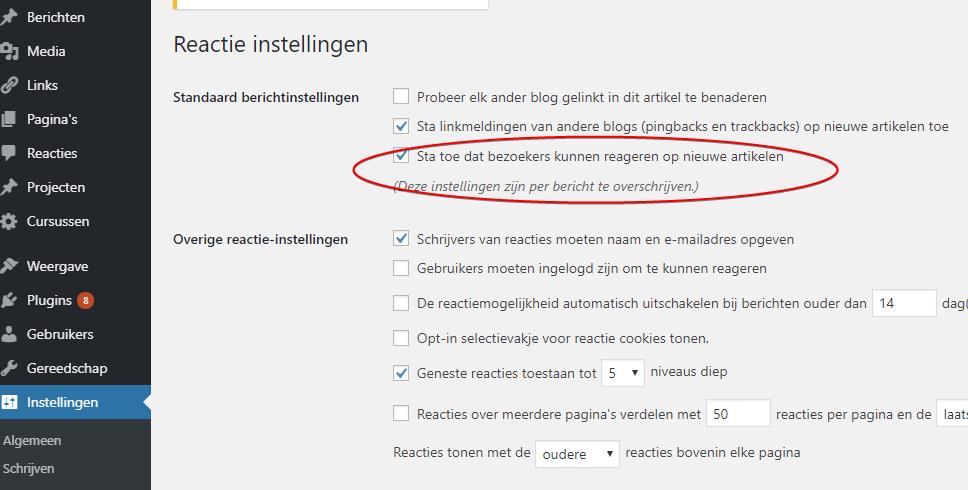
Dit is standaard aangevinkt, tenzij Reacties zijn uitgeschakeld in WordPress-instellingen. Zo niet vind dan onderstaande aan via Instellingen -> Discussie
 Let op: als je reacties toestaan niet ziet, dan dien je bij scherminstellingen Discussie aan te vinken:
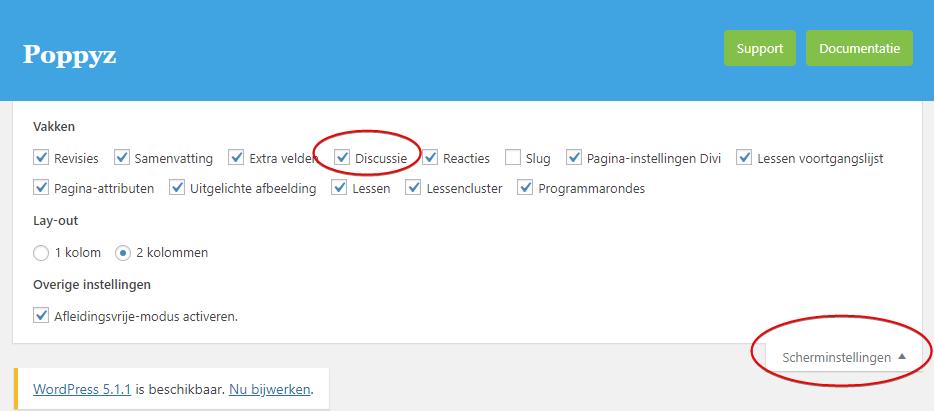
Als bovenstaande is gedaan dan vrschijnt mogelijkheid om een reactie te plaatsen. Let op: dit dien je bij elke cursus en les apart te doen.
Zijn documenten in een cursus of les ook afgeschermd?
Ja deze kan je afschermen. BELANGRIJK: zorg dat je documenten/PDF’s (werkboeken bijvoorbeeld) altijd in de cursuspagina (of lespagina) zelf uploadt vanaf je computer en niet NIET vanuit de bibliotheek van je site. Alleen in dit geval zijn ze namelijk afgeschermd en kunnen alleen ingelogde bezoekers die toegang hebben tot de cursus/les het bestand zien.
In het geval je het document wil linken aan een afbeelding, dan dien je eerst het document te uploaden in de cursus of les, vervolgens kopieer je de bestandslink en link je deze aan de afbeelding, zie onderstaand: 
Vormgeving
Hoe kan ik witruimtes verwijderen op mijn aanschafpagina?
Dit gebeurt meestal wanneer de Divi-editor is ingeschakeld op pagina die je hebt geselecteerd als aanschafpagina in Poppyz. Divi plaatst namelijk (met name bovenin) een lege box, waardoor bovenin hinderlijke witruimte ontstaat en het niet mooi is uitgelijnd. Divi is op deze pagina niet nodig omdat Poppyz alle relevante content (dynamisch) op deze pagina weergeeft. Schakel daarom Divi uit op deze pagina:
1.) Bewerk de pagina.

2.) Klik op onderstaande knop.

3.) Klik op update.

Hoe kan ik de lettergrootte van het login- en registratieformulier aanpassen?
Bij het login- en registratieformulier dat mensen te zien krijgen tijdens de aankoop, kan je zowel de lettergrootte van de titels als van de velden zelf aanpassen.
Ga hiervoor naar: Divi -> Systeemaanpasser van thema -> Algemene Instellingen ->
Aan het aanpassen -> Algemene Instellingen -> Typografie en scroll dan naar Form Label Text Size. Je hebt hiervoor minimaal versie 1.7.9.5 van het Poppyz thema nodig.

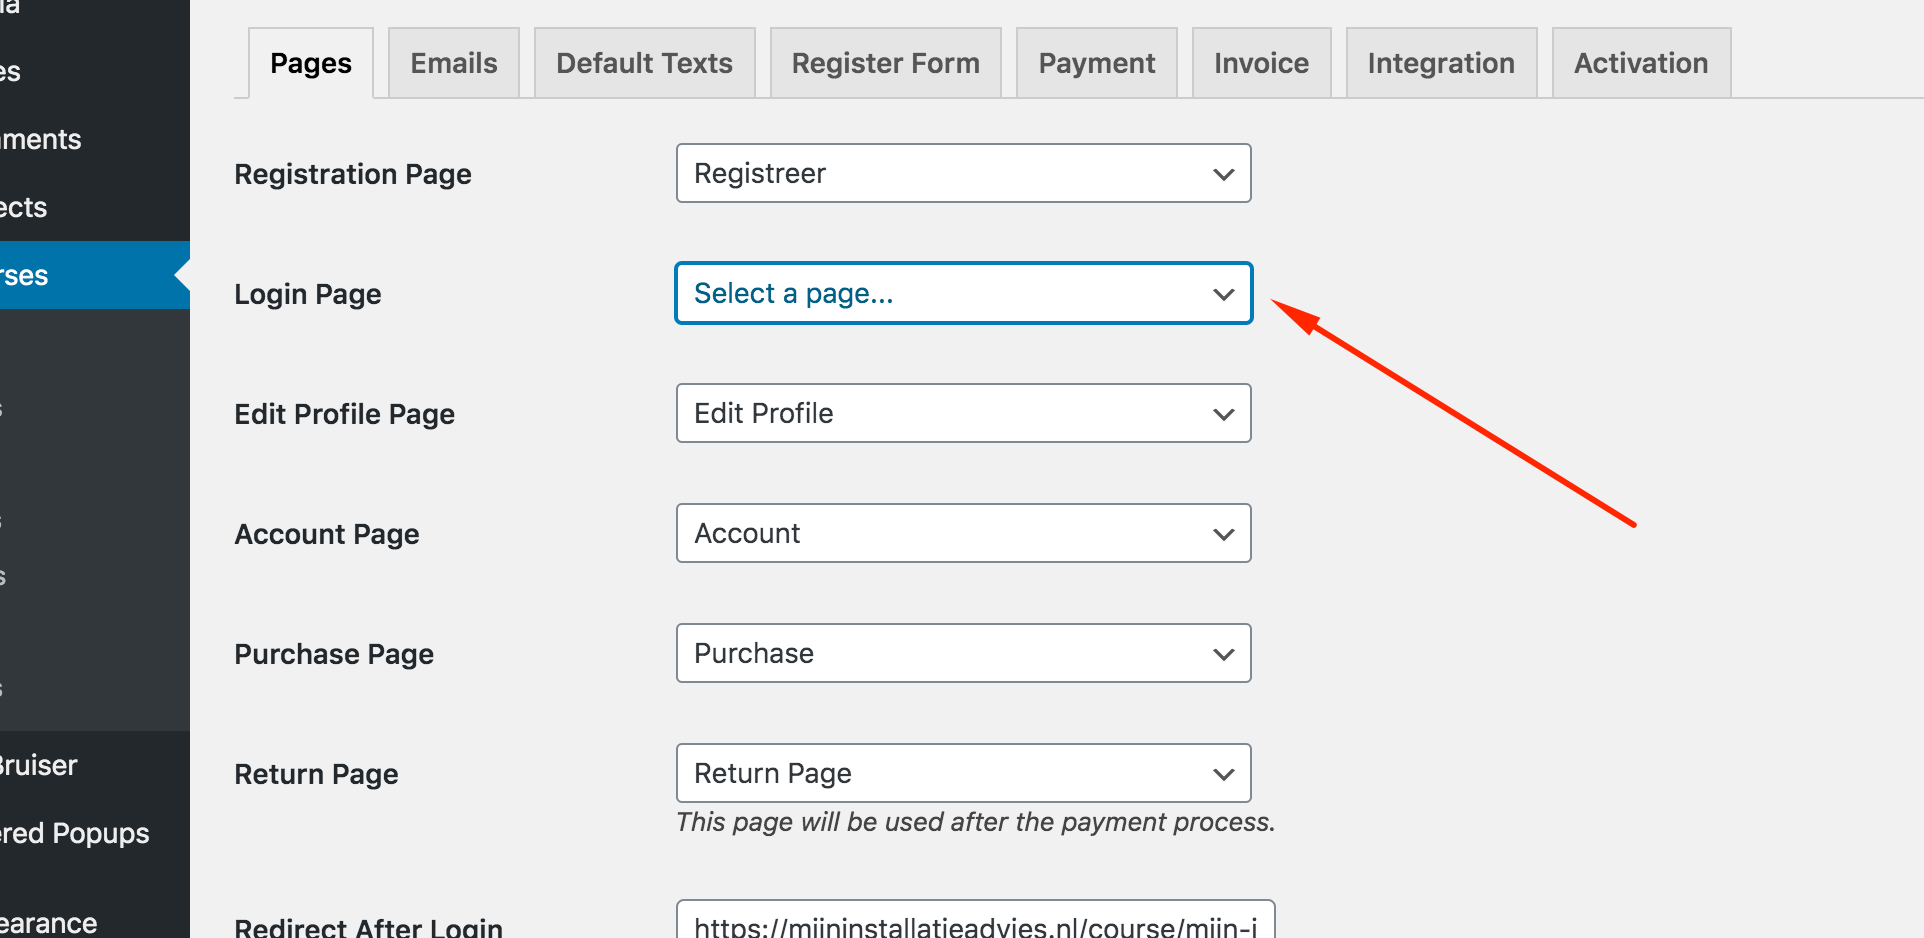
Hoe pas ik de lay-out aan van de login-pagina?
Helaas heeft Poppyz geen functie waarmee het aanmeldingsformulier kan worden aangepast. Als je echter een visuele bouwer zoals Divi gebruikt, dan je gewoon een pagina maken en de Divi Login-module toevoegen. Deze module is volledig aanpasbaar. Lees hier de uitleg hierover.
Let op dat je deze toevoegt aan je menu. “WP login redirects” gebruikt nog steeds de pagina die je hebt ingesteld bij de Poppyz instellingen. Zorg daarom dat je geen pagina hebt geselecteerd bij de Poppyz instellingen. Anders treedt er namelijk een conflict op. Zie onderstaand.
E-mails
Waarom ontvangen ik en mijn gebruikers geen e-mails?
Belangrijke tip: we raden je ten zeerste aan om de mails te laten versturen d.m.v. SMTP. De mails worden dan namelijk via je eigen mailserver verstuurd. De kans dat de mails niet aankomen is daarmee veel kleiner dan als de mails via de website worden verstuurd. de plugin WP-Mail-SMTP te installeren. Hiermee kan je namelijk heel eenvoudig alles instellen en eventueel kiezen om de mails te versturen via je eigen mailserver (SMTP). Lees de uitleg hierover”.
Onderstaande uitleg is alleen relevant als je de e-mails niet via SMTP laat versturen.
Als je de e-mails wel via je website laat versturen, dan is het risico dat ze in de spambox van je klanten terechtkomen. Dit is een veelvoorkomend probleem op websites vanwaar e-mails worden verzonden naar hun gebruikers. Je kan er wel voor zorgen dat de kans zo laag mogelijk is.
- De Email van moet overeenkomen met het domein/URL van je website.
Als je testwebsite.nl gebruikt dan moet de email van er zo uitzien: <watjemaarwilt>@testwebsite.nl - Je kan het veld ook leeg laten zodat WordPress zijn eigen van e-mailadres kan genereren op basis van je domein.
Er kan ook een andere reden zijn voor het probleem: het e-mailsysteem is niet correct geconfigureerd op je server. Als dit het geval is, ligt de oorzaak buiten Poppyz en dien je contact op te nemen met je hostingpartij hoe dit opgelost kan worden. Om te bepalen of dit het geval is, kan je de plugin Check Email plugin installeren. Je kan dit ook testen door een gebruiker van de beheerder te maken. Als je dit doet dan zou er een mail moeten worden gestuurd. Daarnaast kan je met de plugin WP logging mail zien welke mails zijn verstuurd.
Hoe kan ik de afzender aanpassen van de e-mails die vanuit mijn site worden verstuurd?
Het is belangrijk om hier zorgvuldig mee om te gaan omdat e-mails die vanuit een website gestuurd worden vaak in de spam box terecht komen van de ontvanger.
Zorg ervoor dat het risico zo klein mogelijk is en lees de uitleg(met name het deel “Zorg dat je e-mails aankomen”).
Betalingen
Waardoor verschijnt in het betaal-/registratieproces een inlogpagina?
Waarschijnlijk heb je automatisch inloggen uitgeschakeld. Hierdoor moeten mensen eerst inloggen nadat hun profiel automatisch is aangemaakt na het invullen van de registratievelden. Dit kan je bij de instellingen van Cursussen uitschakelen. 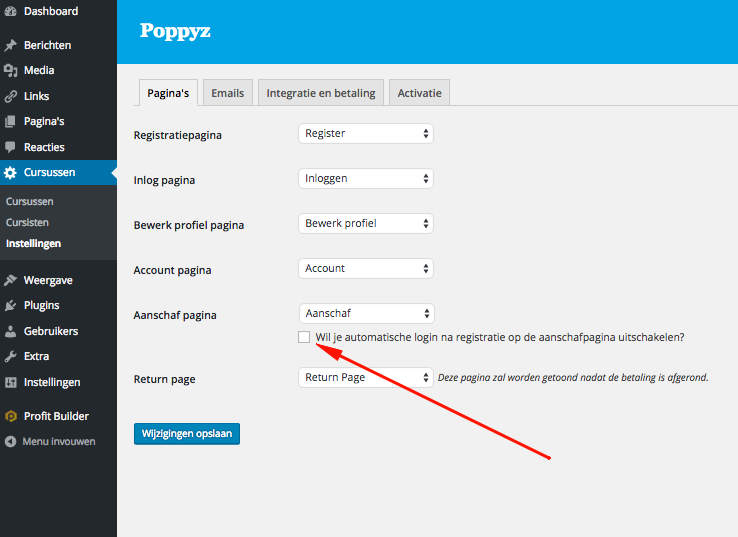
Dit kan ook komen doordat de Permalinks niet correct zijn geconfigureerd. Om Pretty Permalinks in te schakelen, ga je naar WordPress Instellingen -> Permalinks. Kies Berichtnaam en klik op Opslaan.
How do I handle Chargebacks and Refunds?
Sometimes a recurring payment fails to complete and depending on the reason Poppyz tries to make it easier for the client to continue paying.
If the reason for the failed payment is insufficient funds, Poppyz will email the user to inform them that they will need to process that specific payment manually by going to their account and clicking on the Pay button. The succeeding payments will still be processed automatically via SEPA Direct Debit.
For any other reason the whole recurring payment subscription will be stopped, and all succeeding payments will be paid manually by the user by going to their account page.
Chargeback and refunds should be initiated from the customer’s account or from the admin’s Mollie account. This will ensure that Poppyz will handle the rest of the process including creation of credit invoices.
Waarom verschijnt er een lege pagina op het eind van het betaalproces?
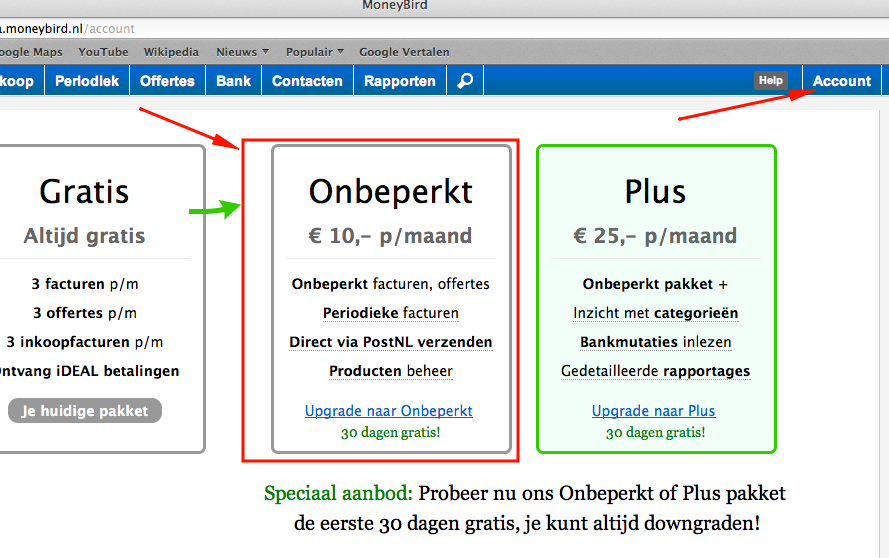
Check of je een gratis Moneybird account hebt. Zo niet; upgrade je Moneybird account naar “Onbeperkt” (kosten 10,-/maand), bij pakket “Gratis” kan je maximaal 3 facturen per maand versturen. Als deze limiet is overschreden kan er in Poppyz geen factuur meer worden aangemaakt en kan je online geen programma’s meer verkopen.
Ga voor upgraden naar Account en klik vervolgens op pakket en betalingen. Zie onderstaand.